a
Thinker has basic word processing capability. The emphasis for Thinker is to augment the creative process not to be the ultimate document formatter. The Hypertext and Outline capabilities are not found in many other products combined as they are in Thinker. The word processing capabilities are sufficient to prepare documents that look reasonably professional.
Editing
Text within a statement is edited much like text in a standard word processor.The cursor is positioned by using the mouse or cursor keys. The horizontal movement cursor keys move the cursor only within a statement. The vertical movement cursor keys move the cursor across statements and will cause scrolling at the top and bottom of the window.
When the mouse is used to position the cursor, the mouse button is used to mark the place in the text. Subsequent typing inserts characters at the cursor location. "Backspace" deletes a character to the left of the cursor and moves the cursor to the left.
All printable keyboard characters are allowed in text. In addition the <ESC> character and <CR> character are allowed. The <ESC> character is used to indicate a print formatting command while printing. The <CR> (carriage return) character is used in formatting tables as a single statement rather than as a group of statements. The <CR> character is visible as "~" and causes the cursor to move to the next line of the statement in the first column of the statement.
The TAB key is used to move statements logically "left" and "right" within the document. The statement is actually moved in the hierarchy and made into a subordinate statement (down 1 level) when moved right and made into a superordinate statement (up 1 level) when moved left. TAB moves to the right, shift-TAB moves to the left. Using the control key with the TAB key causes an entire Branch to move rather than a single statement.
A block of text may be selected by holding down the mouse button while moving the cursor over the text on the screen. Only text that is totally within a single statement can be selected in this fashion. Once selected, the text can be "Cut" from the statement and "Pasted" at some other location. Selected text is replaced by any typed characters and the selected text is removed from the document. Text removed by typeover may be restored using the Undo command.
Words in text is also selected by double clicking if the "Command Key Jump" behavior is selected. This behavior makes editing more convenient at the expense of convenient jumping. The editing mode is much closer to traditional Macintosh modes and can be entered when jumping is not the primary activity.
The "Enable Shift Click" behavior allows the selection of text to be made with two successive clicks of the mouse while holding down the shift key (as in many Macintosh word processors.)
Statements can be split and joined much as paragraphs in traditional word processors using the Return and Backspace keys. By selecting "Return Equals Split" statements are split with the Return key and the position of the cursor (an empty statement is added when the cursor is at the end of a statement) and Joined using the Backspace key if the Backspace key is typed while the cursor is at the absolute beginning of a statement (in front of any label string). Labels associated with joined statements are amalgamated. Holding the shift key down reverses the effect of the "Return Equals Split Behavior setting.
Pictures and text from other applications may be pasted into a statement. Pictures must be pasted into an empty statement. Pictures and text may be Cut or Copied to the clipboard for inclusion in other applications.
Undo is supported with both the "Revert" menu selection and an Undo Edit selection. Each time the cursor is placed in the text using the mouse, the contents of the statement are saved. After any typing the statement may be restored to the state before typing began by selecting the Undo selection from the Edit menu. If you move the cursor with the mouse, the undo contents are reset.
The Revert menu selection removes all modifications including structural changes since the last Save operation. The user should select "revert points" by using the "Save" menu selection. In fact no changes are recorded on the disk until Save is selected. There is a reminder warning presented if the user attempts to leave Thinker without a Save. The dialog gives the opportunity to save or discard the changes.
Search and Replace operations are selected from the Edit menu.
Styles
Text may be typed in any of the standard styles of Bold, Italic, or underlined (or combinations of these). Selected text is set to these styles by first selecting the text and then selecting the style from the Styles menu.When the cursor is placed in a statement, the style of the text that will be entered is set to the style of the character in front of the cursor. If the cursor is at the first character of a statement the style is set to the default. After the cursor is positioned in the text, the typing style may be selected from the Styles menu.
The Default style is selected when the Styles menu is used to select a style while the cursor is not visible. Clicking the mouse while pointing to the empty at the top right of the window box is a quick, safe way of removing the cursor from the text for selection of defaults.
Fonts
Font selection works the same as style selection with the exception of the Default font behavior. The font and size that is used to display or print the entire document is selected on a window by window basis by selecting a font and size while the cursor is not within any text. Click the mouse in the error message box and then select the display or printing font/size for the entire document. It is not necessary to select all the text to change the font of the entire document. Simply select the correct font and size after clicking in the error message box.Any text that has been given an explicit font/size selection (as in style selection) will always be displayed/printed in the the explicitly selected font/size. All other text will float with the window setting.
Any time that the explicit font/size selection is made to the same font/size selection of the window, the selected text will once again float with the window font/size selection.
The font/size of blocks of statements can be set by holding down combinations of shift and control while selecting the font or size. Holding down the shift key changes the font/size of all statements in the Branch in which the cursor is located at the time of the selection.
Holding down the control key changes the font/size of the entire plex.
Holding down both the shift and control keys changes the font/size of the entire plex but only at the level of the statement in which the cursor is located.
Formatting
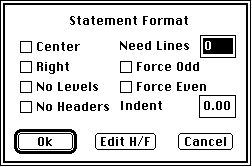
Each statement has an associated format. Selecting the "Statement Format .." selection under the Style menu will display a dialog box that allows definition of the statement format. This dialog is pictured below.

- Center
- The statement is centered on the page.
- The statement is printed against the right margin of the page. The left margin of
the text is staggered.
- No level numbers will be printed with this statement even if the Print selection is
to print level numbers.
- No headers will be printed on the page that this statement is printed on. This is
useful for Title pages.
NOTE: Title pages are usually put at the end of a document so that the first major heading of text is numbered "1".
- This specifies the minimum number of lines that must be available on the page before
printing this statement is started. If there are not enough lines on the page, an automatic
eject is done. Selecting 255 for the number of needed lines will surely cause a page
eject.
- When the "Two Sided" option for printing is specified, this selection forces page ejects
until this statement will appear at the top of an even numbered page. If Two sided printing
is not selected then this selection forces the statement to appear at the top of
the next page.
- When the "Two Sided" option for printing is specified, this selection forces page ejects
until this statement will appear at the top of an odd numbered page. If Two sided printing
is not selected then this selection forces the statement to appear at the top of
the next page.
- When this value is non-zero, the statement is printed with the indentation specified
in 10ths of an inch. This indentation overrides the indentation that is a natural effect
of the text hierarchy.
- As each statement is printed it can cause the contents of the headers and footers to
change. These header/footer values can be edited by selecting the Edit H/F button. If
there are existing Header/Footer values for this statement, the button has a line under
it.
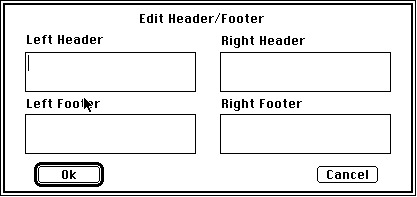
The dialog to edit these values is shown below:

- Left Header
- Any non-null string value here becomes the header on the left side of the page for
the page upon which the statement is printed and for all subsequent pages in the document.
A null string leaves the header value set in the Print Options dialog (for the whole document) unchanged.
- Sets the header on the right side of the page.
- Sets the left footer.
- Sets the right footer.
The default format is modified by using the Statement Format menu selection when the cursor is not positioned in any statement. Click the cursor in the error message box and use "Statement Format" to set the default format for newly inserted statements that are not inserted directly after some existing statement (Up, Down, Above).
Printing
The appearance of a printed document is controlled by the Page Setup dialog sequence. The details of the Print Options dialog are explained in a separate chapter on that subject.A document can be previewed (to some extent) by selecting the Show Format selection of the "Opts" menu. This will cause the text displayed in the window to conform to the page size selection and most of (no headers/footers) the print options selected. Pagination is also shown if the "Paginate" selection under the "Other" menu has been selected or the document has been previously printed. Editing may change the pagination after printer so the Paginate menu selection should be used to insure that the preview is accurate.